

Supported skills
Skills you author yourself appear under User Defined Skills in the same menu, and any custom commands appear under Project Commands and User Commands.
Featured Skills
Improve UI
Kombai uses the Improve UI skill to upgrade your project’s aesthetic quality and interactive feel. It transforms plain or generic interfaces into world-class user experiences by applying professional design principles across typography, color systems, layout structure, and motion, tailored specifically to your app’s unique context.How Improve UI works
Kombai follows a guided, step-by-step process rather than jumping straight from your request to changes. The depth of the process adapts to the scope of what you ask for:- A small, specific change (e.g., “make the header sticky”) is applied directly, exactly as requested.
- A focused improvement (e.g., “improve this card”) is refined within your app’s existing design language.
- An open-ended redesign (e.g., “improve the UI”, “make it modern”) triggers the full process, where Kombai re-imagines structure and visuals while staying true to your product’s character.
- Look at the real UI first. Kombai never works from an imagined interface. It uses a screenshot or running URL you provide, or — with your permission — runs the app and views it directly. If the app can’t be run, it reconstructs the UI from your codebase and confirms that reconstruction with you.
- Understand the current state. Kombai reviews all relevant pages and states (empty, loading, error, filled, and edge cases), extracts your existing design system (colors, typography, spacing, radii, shadows), and maps the information architecture and navigation.
- Diagnose and confirm. Kombai produces a problem list of concrete issues tied to specific screens and components, then shares it with you for confirmation before proposing anything. This is also where you can lock in hard constraints such as a fixed palette, dark mode requirement, or a reference app to take cues from.
- Propose directions you choose from. You own the design language. For a redesign, Kombai presents 2–3 complete design directions — each a representative screen with its own palette, typography, layout/navigation, and density applied — using the same sample data so they’re easy to compare. One is marked as a recommended default, and you can pick one, mix across them, describe your own, or ask to see them rendered on the canvas before deciding. For a focused improvement, Kombai presents a single refined proposal within your current language.
- Implement. Kombai tells you which files it will change and why, reuses your existing tokens and components, installs any missing dependencies, and sources real colors, fonts, and imagery instead of inventing placeholders. It verifies each category of change against the running app as it goes.
- Verify. Once done, Kombai checks the result against the confirmed problem list and your product’s domain and tone before declaring it finished.
- Typography & Scale: Upgrading to premium font scales and high-quality typefaces tailored to your context.
- Color System & Tokens: Replacing generic palettes with neutral bases, refined accents, and advanced shadow diffusion for a modern, polished look.
- Layout Restructuring: Converting basic grids into engaging asymmetric bento grids, zig-zag sections, or split-screen heroes while fixing
h-screenusage. - Flair & Personality: Applying intentional design “edge” through oversized display type, deliberately broken grids, or unique media layering.
- Micro-interactions & Motion: Implementing fluid CSS transitions or spring-physics-based animations for elements that resize or reorder.
- Glassmorphism Upgrade: Replacing shallow background blurs with full refraction for a more premium glass effect.
- Asset & Content Realism: Replacing generic placeholders with realistic figures, contextually relevant names, and high-quality media seeds.
- Interactive States: Adding missing loading skeletons, empty states, and tactile feedback (like
:activescaling) for all interactive elements.
Improve UIUpgrade the generic component defaults with custom radii, shadows, and refined typography to make it look more premium.Improve UIConvert standard feature rows into asymmetric bento grids or alternating zig-zag layouts.Improve UIThe dashboard feels cluttered. Suggest some improvements to the visual hierarchy and spacing.Improve UIAdd more personality and “flair” to my portfolio showcase.Improve UIReview the checkout flow and make the interactions feel more fluid and high-end.
Clone URL
Kombai uses the Clone URL skill to recreate a live webpage as an editable design on the Kombai Canvas. Provide the URL of the page you want to recreate. Kombai opens the page in the Kombai Browser, captures it section by section, analyzes its layout, colors, typography, fonts, and assets, and rebuilds it as a faithful, fully editable design. Cloning works for any public URL. The cloned design is a starting point you can iterate on — remix it for a different use case, generate versions for other devices or color modes, animate it, or ask Kombai to implement it in your codebase. For pages with light animations, Kombai recreates the motion with plain CSS. For animation-heavy pages (scroll-driven motion, pinned sections, WebGL), Kombai detects the animation libraries the page uses and plans equivalent motion in the recreated design. Here are some examples of Clone URL:Clone URLRecreate https://stripe.com as an editable design on my canvas.Clone URLClone https://linear.app so I can use its landing page as a starting point for our marketing site.Clone URLClone our current homepage at https://acme.com and then help me redesign the hero section.
Generate Image
Kombai uses the Generate Image skill to generate AI images from a text prompt. You can configure the model, aspect ratio, and output resolution before generation, and Kombai shows you the estimated cost per image upfront so there are no surprises. When you run Generate Image, Kombai opens an Image Parameters panel where you configure the generation settings:-
Model: Choose from eight image generation models:
- Aspect Ratio: Select the output dimensions — 1:1, 16:9, 9:16, 4:3, or 3:4 — to match your target use case (social media, hero banners, portraits, etc.). The available aspect ratios depend on the selected model.
- Output Resolution: Some models let you choose an output resolution — for example, nano banana pro supports 1K, 2K, and 4K. Other models generate at a fixed resolution with no resolution control.
- Rendering Speed: Some models let you choose a rendering speed instead of a resolution. For example, ideogram v4 supports TURBO, BALANCED, and QUALITY.
- Cost estimate: Before you proceed, Kombai displays the estimated cost per image based on your selected model and resolution, so you can make an informed decision.
Generate ImageA minimalist hero illustration of a developer working at a desk with floating code snippets.Generate ImageA dark-themed abstract background with glowing grid lines for a SaaS landing page.Generate ImageA friendly robot assistant waving, suitable for an onboarding screen.Generate ImageA photorealistic product mockup of a mobile app on a smartphone, in portrait orientation.
Generate Video
Kombai uses the Generate Video skill to generate short AI videos from a text prompt. You can configure the model, aspect ratio, resolution, duration, and audio before generation, and Kombai shows you the estimated cost upfront so you know exactly what you’ll be charged. When you run Generate Video, Kombai opens a Video Parameters panel where you configure the generation settings:-
Model: Choose the video generation model:
- Aspect Ratio: Choose the aspect ratio to match your target format (e.g. 16:9 landscape or 9:16 portrait). The available options depend on the selected model.
- Output Resolution: Select the output resolution (e.g. 720p, 1080p, or 4k) depending on the quality and file size you need. Available resolutions depend on the selected model — some models generate at a fixed resolution.
- Duration: Choose the length of the generated video. The available durations depend on the selected model.
- Audio: Toggle audio enabled or disabled for the generated video.
-
Reference Image URL (optional): Provide a publicly accessible image URL (ending in
.png,.jpg,.jpeg, etc.) to use as the starting frame or visual reference for the video. - Cost estimate: Before you proceed, Kombai displays the estimated cost based on your selected model, resolution, audio setting, and duration, so you know exactly what you’ll be charged. The exact rate varies by model.
Generate VideoA slow cinematic pan across a futuristic city skyline at night, in 16:9.Generate VideoAn animated logo reveal for a SaaS product, clean and minimal, 4s.Generate VideoA looping abstract background with flowing gradient waves, suitable for a hero section.Generate VideoA short product demo clip showing a mobile app interface in portrait orientation.
Generate animations
Kombai uses the Generate animations skill to add a ready-made animation pattern to your design. Selecting it opens a submenu of animation patterns — pick one and describe where you want to apply it. The available patterns are:
For free-form animation instead of a prebuilt pattern — entrance reveals, scroll-triggered effects, hover micro-interactions — use the Animate Design skill.
Here are some examples of Generate animations:
MarqueeAdd an infinite logo wall of our customers below the hero.Fan CarouselTurn the testimonials section into a fan carousel.Scroll DeckMake the product tour a scroll-driven stacking deck.
Design System Skills
Import Design System
Kombai uses the Import Design System skill to generate a Design System from an existing source. Selecting it opens a submenu of sources — pick one and provide what it asks for:
Kombai analyzes the source and saves the extracted Design System as a
.ds file, ready to be applied to designs or attached to the chat as context. See Create a Design System for other ways to create one.
Here are some examples of Import Design System:
Import Design System - URLExtract the design system from https://stripe.com.Import Design System - CodebaseExtract the design system from this workspace.Import Design System - FigmaCreate a design system from these Figma designs: https://figma.com/design/…
Sync Design System with Codebase
Kombai uses the Sync Design System with Codebase skill to bring a Design System up to date with the styles actually used in your codebase. Choose the Design System to sync — if none exists yet, Kombai creates one from the codebase. Kombai re-reads your codebase’s design tokens (CSS variables, Tailwind config, theme files, and component styles) and updates the Design System to match. This is useful after a rebrand, a theme refactor, or any change to your colors, typography, or spacing. Here are some examples of Sync Design System with Codebase:Sync Design System with CodebaseSync our design system with the current theme in the repo.Sync Design System with CodebaseUpdate the Acme design system to match the codebase after our rebrand.
Design Skills
Remix Design
Kombai uses the Remix Design skill to repurpose an existing canvas design for a different use case while keeping the design itself exactly the same. The sections, layout, animations, colors, and typography stay frozen — only the copy (text) and the assets (images, videos, illustrations, icons) are rewritten for the new use case. Attach or select the design you want to remix and describe what it should become. If any assets need to be replaced, Kombai proposes the list of new assets and asks for your confirmation (with the estimated cost) before generating them; otherwise, it falls back to stock assets or placeholders. The remix is always created as a new design — the source design is never modified. Here are some examples of Remix Design:Remix DesignTurn this SaaS analytics landing page into one for a fitness-coaching app.Remix DesignRepurpose this fintech homepage for a meal-kit delivery service.Remix DesignRemix this e-commerce design for a travel booking startup.
Generate Version
Kombai uses the Generate Version skill to create a device- or color-mode-specific version of an existing canvas design. The version is a faithful adaptation of the source design — the content, typography, and visual identity stay the same; only the layout reflows for the target device, or the colors invert for the target mode. You can generate the following versions:- Device versions — mobile, tablet, or desktop. The layout reflows for the target viewport: columns stack, touch targets enlarge, and navigation collapses on smaller screens.
- Color-mode versions — light or dark. Backgrounds, surfaces, text, borders, and shadows invert while the palette identity, imagery, and copy stay unchanged.
Generate VersionCreate a mobile version of this landing page.Generate VersionGenerate a dark mode version of this dashboard.Generate VersionCreate a tablet dark-mode version of this pricing page.
Audit Design (UI/UX)
Kombai uses the Audit Design (UI/UX) skill to generate a comprehensive review report of the complete UI/UX design of your app. This helps you ensure the design is visually appealing, user-friendly, responsive, and highlights the brand identity. When you run Audit Design (UI/UX) for a particular page or route, Kombai asks clarifying questions to gather more details about the specific design aspects you want to review. It asks questions to understand your intent, such as:- Purpose of the wireframe
- Specific design aspects to prioritize in review
- Any existing problems that you are already aware of
- Visual Design: Reviews visual fidelity by reviewing color palettes, typography scales, and spacing tokens to ensure the implementation matches the aesthetic intent.
- UX/Usability: Reviews navigation patterns and information hierarchy to ensure logical user flows and intuitive usability across the application.
- Responsive/Mobile: Reviews layout adaptation across various breakpoints, ensuring mobile-optimized layouts and accessible touch targets for handheld devices.
- Accessibility: Reviews compliance with WCAG standards by checking contrast ratios, ARIA attributes, and ensuring full keyboard navigation support with visible focus states.
- Micro-interactions/Motion: Reviews interactive elements to ensure hover states, animations, and transitions are present and fluidly implemented.
- Consistency: Reviews deviations in design usage across multiple pages to ensure strict adherence to your design system and component library.
- Performance: Reviews the design’s impact on rendering, flagging potential bundle size issues and optimization opportunities for a smoother user experience.
Audit Design (UI/UX)Can you help me review the settings page layout of my app?Audit Design (UI/UX)Do a design review of my website’s testimonial section.Audit Design (UI/UX)I need a design review focusing on the mobile responsiveness of my checkout flow.Audit Design (UI/UX)Review the overall design consistency across my landing page.
Find Inspirations
Kombai uses the Find Inspirations skill to search specific Inspirations based on your prompt. It shares all the matching inspirations in the chat for you to open and check. Click an inspiration to open its detail page, where you can Refer it into chat as a reference or Save to canvas. Here are some examples of Find Inspirations:Find InspirationsDark fintech dashboard with dense data tables.Find InspirationsEditorial hero with serif type.Find InspirationsPricing sections for a B2B SaaS product.Find InspirationsScroll-driven reveal animations for a marketing page.
Animate Design
Kombai uses the Animate Design skill to add motion to an existing canvas design. When you run it, Kombai asks you to choose between two approaches:- Motion library — free-form animation applied to the design as it is: entrance reveals, scroll-triggered effects, smooth scrolling, and hover micro-interactions. Kombai picks the library that best fits your stack and the effects you want (e.g., GSAP, Lenis, Motion, Anime.js, or Framer Motion).
- Signature pattern — rebuilds a section of the design around one prebuilt showpiece animation, such as a marquee or a scroll-driven deck. See Generate animations for the available patterns.
Animate DesignAdd scroll-triggered reveal animations to this landing page.Animate DesignAnimate the hero heading on load and add hover micro-interactions to the cards.Animate DesignBring this design to life with smooth scrolling and parallax.
Wireframes & Diagrams
Create Wireframe - HTML
Kombai uses the Create Wireframe - HTML skill to generate wireframes aligned with your specific information architecture and data presentation needs. When you run Create Wireframe - HTML, Kombai asks clarifying questions to gather more details about the specific layout options you want to consider. It asks questions to understand your intent, such as:- Primary goal of the page
- Layout structure
- Content density
- Navigation patterns
- Responsiveness priority (Mobile-first vs. Desktop-first)
[REUSE] badge. For new elements, Kombai will label them with the component name and an orange [NEW] badge.
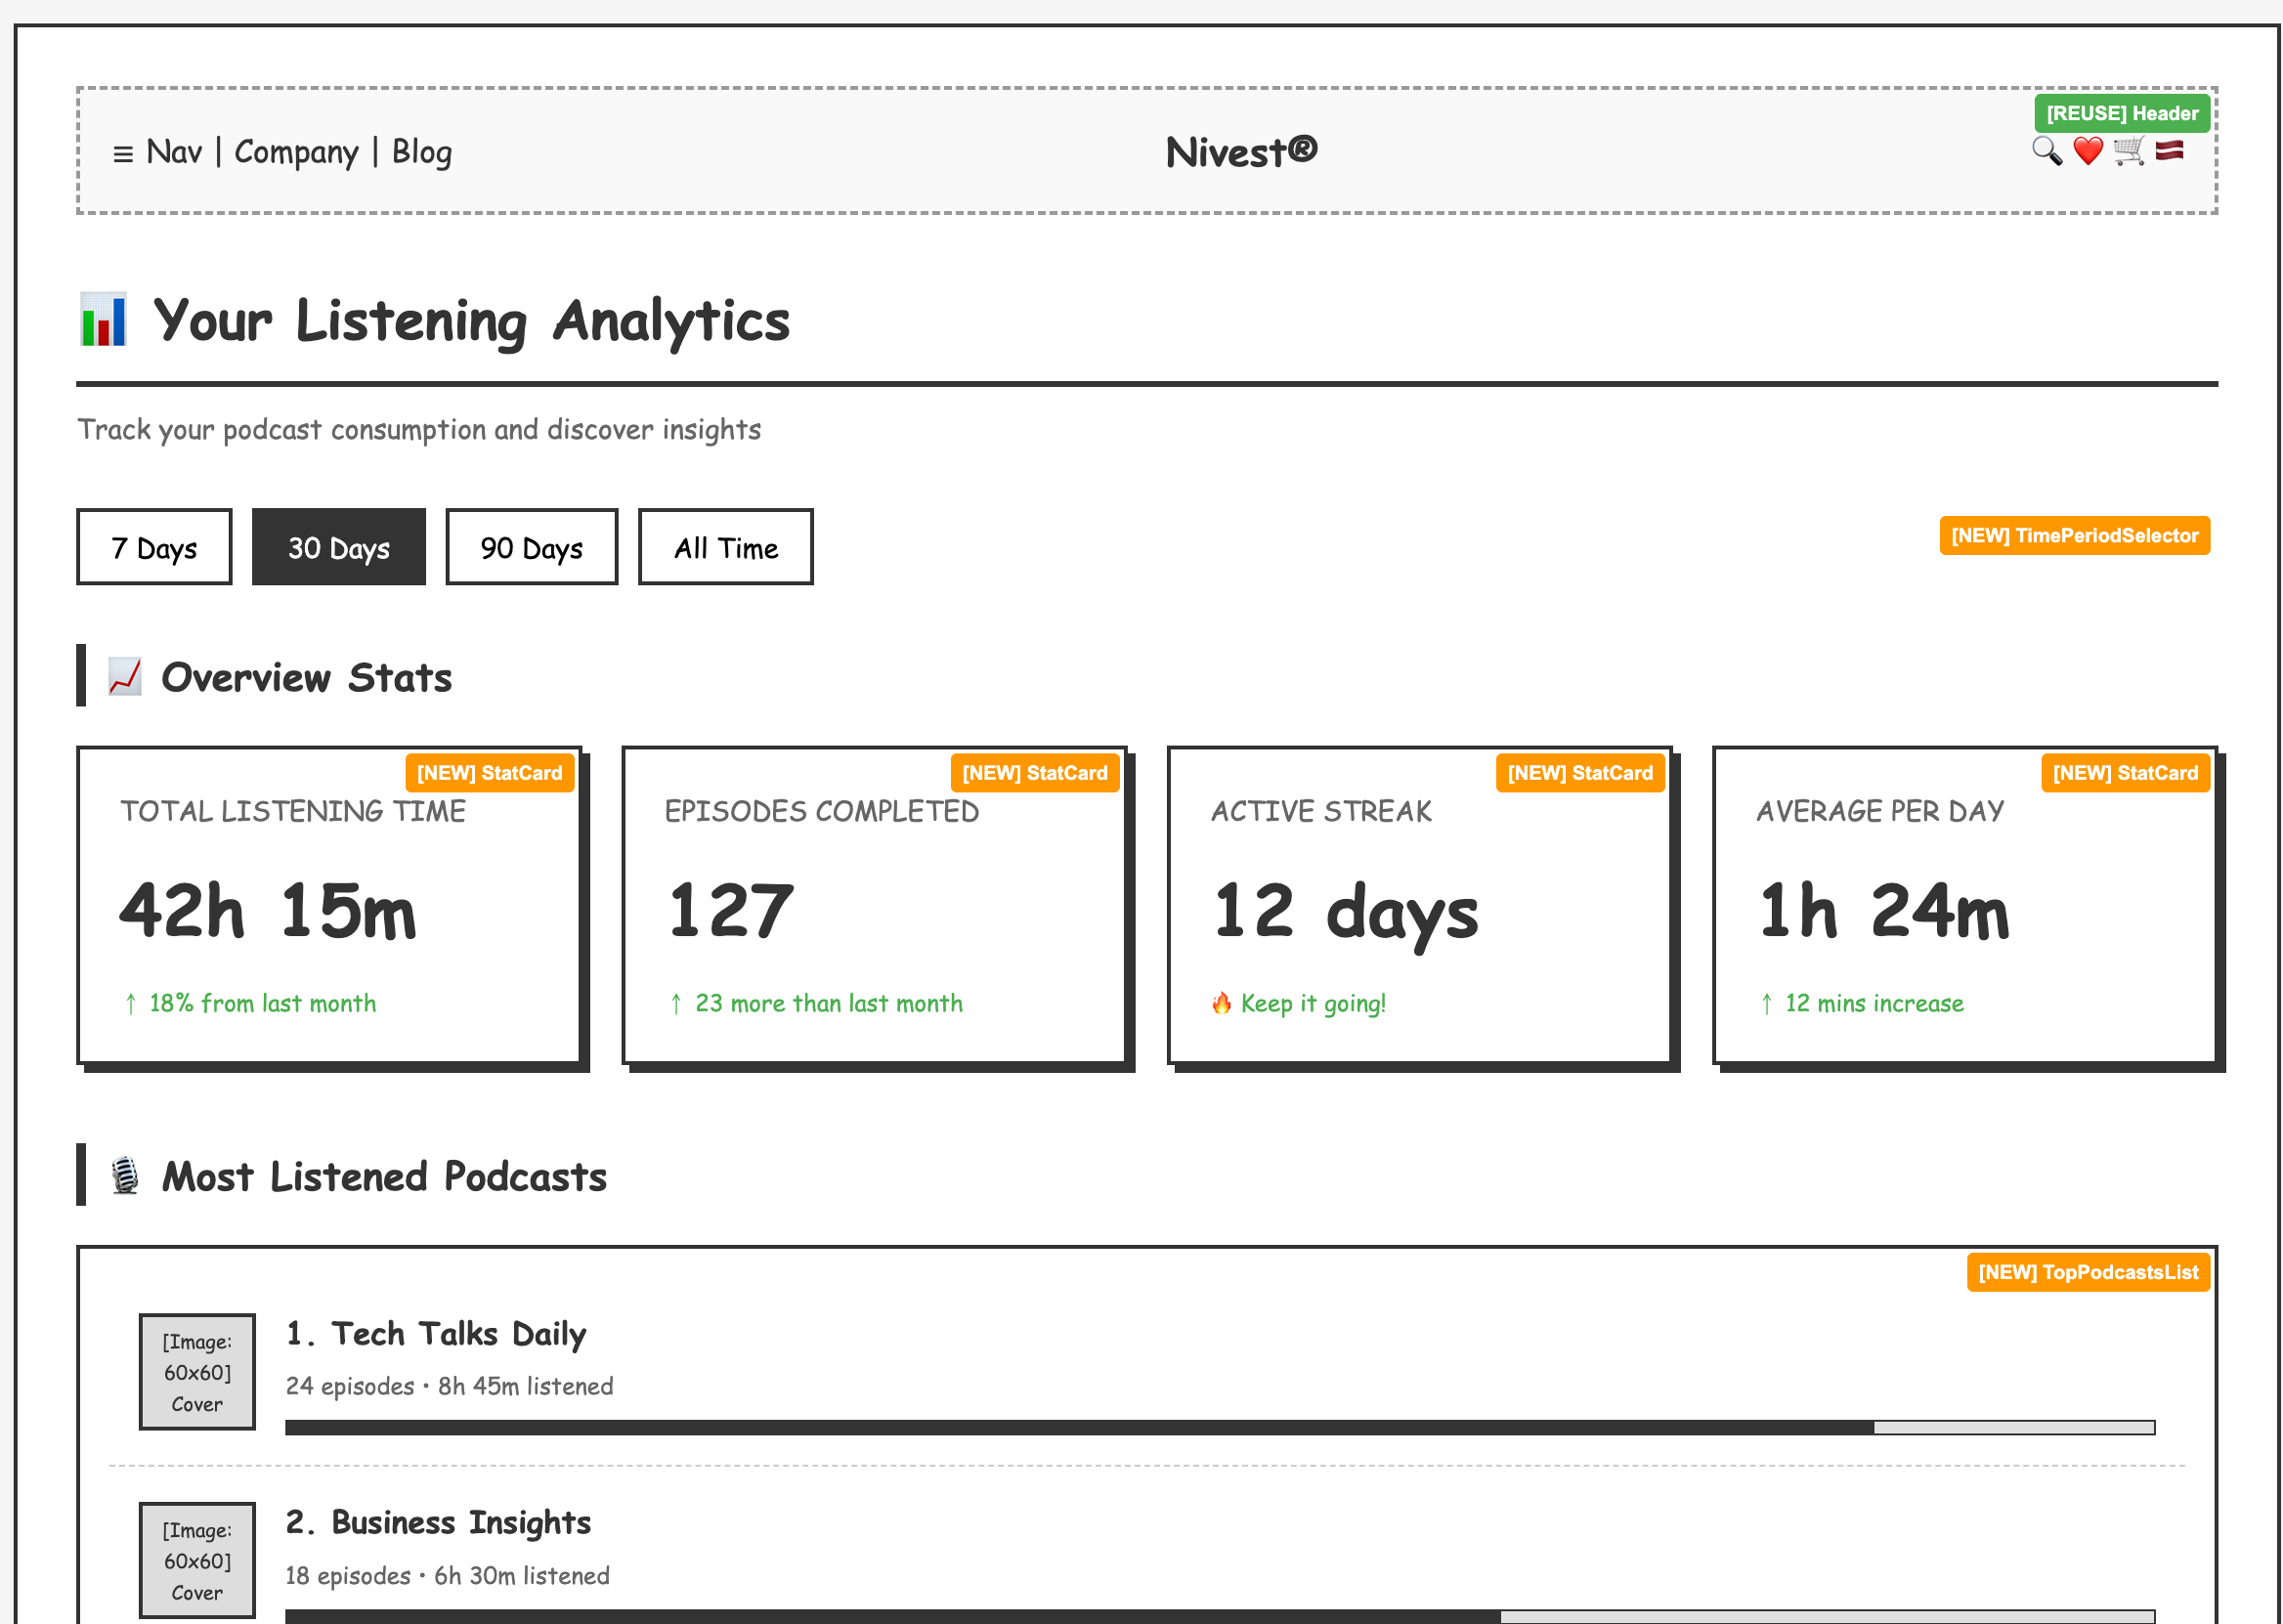
Create Wireframe - HTMLI want to improve the hero section of the website. Can you create some wireframe options that can match this website’s hero section?Create Wireframe - HTMLGenerate some wireframes for the About section of my website.Create Wireframe - HTMLI need wireframes for an e-commerce product listing page with filters and sorting.Create Wireframe - HTMLGenerate layouts for my blog post page with sidebar navigation and related articles.
Create Wireframes - Excalidraw
Kombai uses the Create Wireframes - Excalidraw skill to generate wireframes as Excalidraw diagrams that you can open, edit, and paste back into Kombai’s chat to continue iterating. See Open Excalidraw diagrams for details. Kombai asks clarifying questions to gather more details about the specific layout options you want to consider. It asks questions to understand your intent, such as:- Page or application type
- Layout structure preference
- Content density
- Navigation patterns
- Responsiveness priority
- Grayscale and low-fidelity: Wireframes are rendered in a simple, sketch-like style using only grayscale tones, keeping the focus on structure and layout rather than visual styling.
- Component annotations: Each section is clearly labeled. Reusable components from your repo are marked with a
[REUSE]badge, while new components are marked with a[NEW]badge. - Realistic content: Wireframes use meaningful placeholder content instead of generic filler text. For example, actual table headers, form field labels, and card descriptions that reflect what the real UI would display.
Create Wireframes - ExcalidrawI want to redesign the dashboard layout. Generate some wireframe options.Create Wireframes - ExcalidrawCreate wireframes for a settings page with tabbed navigation and form sections.Create Wireframes - ExcalidrawGenerate wireframes for a pricing page with comparison tables.Create Wireframes - ExcalidrawI need wireframe options for an onboarding flow with a multi-step wizard.
Open Excalidraw diagrams
To open a generated Excalidraw diagram for manual editing:- Hover over the generated diagram to reveal action icons on the top-right corner. Click the maximize icon to open a full preview in a new tab, or click the external link icon to get the Excalidraw link.
- Copy the link, or click the Open button to directly open it in your browser.
- Make your changes — move elements around, resize sections, add new shapes or text, or remove parts you don’t need.
- Once done, drag your cursor to select all the relevant elements of your updated diagram.
- Copy the selection (Ctrl + C on Windows or Cmd + C on Mac).
- Paste it back into Kombai’s chat input (Ctrl + V on Windows or Cmd + V on Mac) and send a follow-up message describing the changes you made or what you’d like Kombai to do next.
Create Mermaid
Kombai uses the Create Mermaid skill to generate diagrams using Mermaid syntax. Mermaid diagrams are rendered as interactive visual diagrams directly in Kombai’s chat, making them easy to review at a glance. You can follow up with Kombai to iterate on the diagram, modify the structure, add or remove nodes, or change the diagram type. Here are some examples of Create Mermaid:Create MermaidGenerate a sequence diagram showing the authentication flow in my app.Create MermaidCreate a flowchart of the checkout process.Create MermaidVisualize the database schema as an ER diagram.Create MermaidGenerate a diagram for the models in my project.
Create Architectural Diagram - Excalidraw
Kombai uses the Create Architectural Diagram - Excalidraw skill to generate architectural diagrams as Excalidraw diagrams that visualize your system’s architecture, data flow, component relationships, or infrastructure layout. The generated diagrams are fully editable. See Open Excalidraw diagrams for how to open, edit, and paste them back. When you run Create Architectural Diagram - Excalidraw, Kombai analyzes your project structure — scanning for services, modules, APIs, routes, infrastructure configuration files (Docker, Kubernetes, Terraform, etc.), external services, databases, and third-party integrations. It then asks clarifying questions to understand:- Diagram type (system overview, data flow, infrastructure, component/module, or sequence diagram)
- Level of detail (high-level overview, medium, or detailed)
- Scope (full system, frontend only, backend only, or a specific subsystem)
-
Professional color coding: Components are color-coded by type for easy identification:
- Labeled connections: Arrows are labeled with protocols and communication methods (HTTP, gRPC, WebSocket, etc.) to show how components interact. Port numbers and endpoints are included where relevant.
- Logical layout: Components are arranged in logical layers (presentation → application → data) with consistent flow direction, minimized arrow crossings, and boundary boxes grouping related components.
- Clear annotations: Each component is labeled with its name and type, with brief descriptions where helpful.
Create Architectural Diagram - ExcalidrawGenerate a high-level system architecture diagram for my project.Create Architectural Diagram - ExcalidrawCreate a data flow diagram showing how user requests move through the backend.Create Architectural Diagram - ExcalidrawVisualize the infrastructure and deployment setup of my app.Create Architectural Diagram - ExcalidrawGenerate a component diagram showing the frontend module dependencies.
Web Vitals
Improve Accessibility
Kombai runs the Improve Accessibility skill to analyze your project’s accessibility based on WCAG 2.0, 2.1, and 2.2 accessibility standards and generate a report of the issues found, along with suggestions to resolve them. When you run Improve Accessibility for a particular page or route, Kombai opens the URL in the Kombai Browser, interacts with the page, and reads the DOM element code from the browser dev tools to analyze accessibility issues. Under the hood, Kombai uses the Axe-core engine to detect accessibility issues. Here are a few examples of accessibility issues that Kombai detects:- ARIA attributes: Validates that elements only use ARIA attributes supported by their specific role (e.g., ensuring a heading doesn’t have a checkbox attribute).
-
Keyboard scrollability: Identifies scrollable containers missing a
tabindexattribute, which prevents keyboard-only users from accessing hidden content. -
Video captions: Verifies that
<video>elements include caption tracks, ensuring content is accessible to users with hearing impairments and indexable by search engines. - Touch target size: Ensures interactive elements (buttons, links) are large enough and spaced appropriately so mobile users can tap them without accidentally hitting neighboring elements.
- Image alt text: Detects images missing alt attributes or valid presentation roles, which are critical for accessibility compliance.
Improve AccessibilityCheck if all form inputs have proper labels and ARIA attributes.Improve AccessibilityCheck for color contrast issues and add missing alt text to the homepage images.Improve AccessibilityVerify that our modal dialogs are keyboard navigable and screen reader friendly.Improve AccessibilityCheck if the/blogpage is fully accessible with proper headings and ARIA attributes.
Improve SEO
Kombai uses the Improve SEO skill to analyze your project’s on-page and technical SEO elements and generate a detailed report of all crawlability and indexability issues found, along with suggestions to resolve them. When you run Improve SEO for a particular page or route, Kombai opens the URL in the Kombai Browser, interacts with the page, and reads the content, along with performance metrics from the browser dev tools, to analyze SEO issues. Here are the SEO issues that Kombai detects:-
Crawlable anchors: Validates that anchor tags are accessible and indexable, flagging issues like empty hrefs,
javascript:void(0)targets, off-screen positioning, negativetabindex, and more. - Canonical URL: Detects invalid canonical URLs, multiple conflicting canonical URLs, root canonical URLs on subpages, and more.
- Legibility: Audits for visual accessibility, ensuring text meets WCAG contrast standards and maintains legible sizes on mobile viewports.
- Hreflang tags: Detects malformed language codes and non-absolute links in your international SEO tags.
- Link text: Identifies generic anchor text (e.g., “click here,” “read more”) to ensure links provide valuable context for search engines.
-
Search visibility: Validates that the page is technically accessible to search bots by auditing HTTP status codes,
robots.txtsyntax, and exclusion directives (likenoindexor X-Robots-Tag), while also ensuring essential meta descriptions are populated.
Improve SEOCheck if all product pages have proper meta descriptions and canonical URLs.Improve SEOVerify hreflang implementation for our multi-language site.Improve SEOCheck if all the documentation pages are crawlable.Improve SEOCheck for generic anchor text like “click here” and “read more” across the site.Improve SEOVerify that robots.txt and meta tags are not blocking important pages from indexing.
Workspace & Scaffolding
Summarise Thread
Kombai uses the Summarise Thread skill to produce a concise summary of your current conversation thread and save it as a Markdown file in.kombai/summaries/. This is useful for handoffs, archival, or maintaining a decision log.
When you run Summarise Thread, Kombai asks a few clarifying questions to understand your intent and the desired scope of the summary, such as:
- Intent: Why do you need this summary? Options include continuing work in a new thread, handing off to a teammate, archiving a completed task, or creating a decision-log entry.
- Scope: Should the summary cover the entire thread or only a specific portion (e.g., “from the point where we started the refactor”)?
- Detail level: Any specific emphasis or exclusions you’d like to make (e.g., “focus on the rationale behind the API design decisions”).
auth-flow-debugging.md). It analyzes the thread to extract only non-trivial information—context that another agent or person cannot easily rediscover by reading the code or searching the repo.
Here are some examples of Summarise Thread:
Summarise ThreadI’m finished with the refactor. Can you summarize this thread for my teammate?Summarise ThreadSummarize our discussion about the authentication flow from the point where we started debugging the JWT issue.Summarise ThreadCreate a decision-log entry from this conversation regarding the choice of GSAP for animations.Summarise ThreadI want to continue this work in a fresh thread. Please summarize the current state and open TODOs.
Create Rule
Kombai uses the Create Rule skill to author rule files that encode coding standards, architectural patterns, and team conventions for the agent to follow across all conversations. When you run Create Rule, Kombai asks a few clarifying questions to ensure the rule is tailored to your exact needs:- Purpose: What behavior should Kombai always exhibit or avoid?
- Scope: Should this rule apply globally or only in the current repository?
- Trigger conditions: When should this rule apply (e.g., always, during code reviews, or for specific file types)?
- Specificity: Should the rule be broad (“always prefer composition over inheritance”) or narrow (“never use
anyin files undersrc/api/”)? - Examples: Can you provide good or bad examples to illustrate the desired behavior?
Create RuleI want to enforce a rule that all API service files must use a specific error-handling wrapper.Create RuleCreate a rule that prefers composition over inheritance in our React component library.Create RuleForbid the use ofanyin files under thesrc/api/directory.Create RuleAll new UI components must include basic ARIA attributes for accessibility.
Create Command
Kombai uses the Create Command skill to create reusable commands that encode repeatable tasks you or your team perform regularly. When you run Create Command, Kombai asks a few clarifying questions to ensure the command is tailored to your exact needs:- Purpose: What does the command do, and when should it be invoked?
- Scope: Should the command be available globally or only in the current repository?
- Inputs: What information is required from the user each time the command runs?
- Output: What is the intended deliverable (e.g., a new file, code refactors, or a shell sequence)?
- Constraints & edge cases: Are there validation rules or naming conventions to follow?
- Boundaries: What is explicitly out of scope, and what actions should the command strictly avoid?
/ command list. You can then use it to automate the task or publish it to share with your team.
Here are some examples of Create Command:
Create CommandI want to generate unit tests for a React component using Vitest.Create CommandHelp me refactor old class components into functional components with hooks.Create CommandCreate a reusable command for generating API documentation from source code comments.Create CommandI want you to standardize the creation of new feature modules in my project.
Create Skill
Kombai uses the Create Skill skill to author custom, high-quality skills for your specific needs. Unlike rules, which are always on, skills are contextual instruction sets that Kombai fetches on demand when they match the domain of your task. When you run Create Skill, Kombai asks a few clarifying questions to ensure the skill is tailored to your exact needs:- Purpose & domain: What task or domain does this skill cover, and when should Kombai fetch and use it?
- Scope: Should this skill be available globally or only in the current repository?
- Workflow steps: What step-by-step process should Kombai follow when the skill is active?
- Constraints & quality criteria: What rules and standards must the output adhere to?
- Examples: Can you provide reference implementations or expected output examples?
SKILL.md file within a dedicated kebab-case folder in your specified skills directory. Once created, the skill is automatically detected and activated whenever a task matches its description.
Here are some examples of Create Skill:
Create SkillI want to create a skill for adding new GraphQL resolvers following our team’s schema patterns.Create SkillHelp me author a skill for migrating legacy CSS files to Tailwind CSS utility classes.Create SkillCreate a skill that encodes our internal process for setting up new microservices in the monorepo.Create SkillStandardize how we document and generate stories for our UI component library.